Website care
What to prepare before your website project starts
You do not need to write a perfect website brief. You need a small, accurate starter pack so your designer can build the right thing and know who can approve it.
The whole process, at a glance
- Gather the facts1 of 3
- Share access and assets2 of 3
- Choose one approver3 of 3
Before you start
This is for the business owner or person coordinating the project. Start with one shared folder and one document. Mark unknown answers clearly rather than guessing.
A practical example
| Starter-pack item | A useful answer |
|---|---|
| Main goal | Requests for a site visit |
| Public service area | The cities you actually serve |
| Inquiry owner | One responsible person, with a backup |
| Missing content | What is missing, who supplies it, and when |
| Final approval | One named decision-maker |
Follow these steps
Describe the job the website must do
Write one sentence about your customer and one action you want them to take. For example: “We help local offices arrange weekly cleaning. The website should bring us requests for a site visit.” List the agreed pages, deadline, and items outside the project. A new booking system or online store needs a separate scope decision.
Write down the business facts
Include the public business name, phone, inquiry email, opening hours, real service areas, and the correct website address. State whether customers can visit your address. List the services you want, the work you do not take, and any factual claims that need evidence. Identify who will answer new inquiries.
Find the accounts and their owners
Record the domain registrar, hosting or builder, and who owns each account. Include Google Business Profile, Search Console, and Analytics if used. Use separate invitations: GoDaddy, Hostinger, Shopify, Business Profile, Search Console, and GA4. Never put passwords in the shared brief.
Send usable content and original files
Gather the logo, team or location photos, service descriptions, FAQs, and approved testimonials. Label photos with what they show and whether you have permission to publish them. Keep original-resolution files. Add two or three reference websites with a sentence explaining what you like; do not ask the designer to copy another business’s words or images. If you use Google Drive, choose New → New folder, name it for the project, and choose Create. Open that folder, then use New → File upload or Folder upload. Wait for uploads to finish, and share the folder with the agreed recipient. The photo and file checklist covers the final access check.
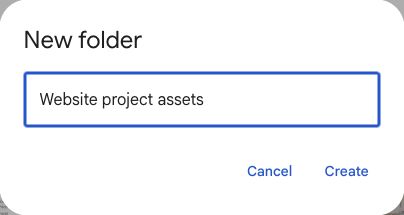
Give the project one clearly named folder. This is a real Drive dialog with an example name; the capture was canceled without creating a folder. September 6, 2026. Select the image to enlarge. 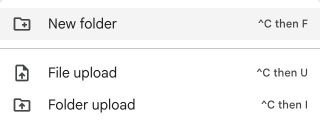
Inside the intended project folder, use New → File upload for individual originals or Folder upload for an organized set. Actual Google Drive menu, September 6, 2026. Select the image to enlarge. Agree how review and launch work
Choose one person to collect feedback and approve the final version. Set realistic dates for missing inputs. Agree who checks factual details, forms, mobile pages, and account ownership. Identify who gives launch approval and who handles later edits. Record any ongoing support separately from the build.
You’re finished when…
Your designer has a usable brief, the required access works, missing inputs have owners and dates, and everyone knows who approves launch.
If you get stuck
I do not know which provider hosts the site
Use the domain, hosting, and builder guide. Renewal invoices and the existing admin login are useful evidence.
We do not have professional photos
Send clear original phone photos of the real business. Your designer can identify gaps before you spend money on a shoot.
Can the designer write the copy?
If writing is included in your scope, send facts and rough notes. You still need to approve accuracy, service promises, and any claims.
Official sources and further reading
- Google: helpful, people-first website content
- Google: guidelines for representing a business
- Google Drive: create and organize folders
- Google Drive: upload original files and folders
Reviewed September 6, 2026. Platform menus can vary by account and change over time. Examples and checklists are WinflowAI’s own guidance; follow the linked vendor instructions for your account.
Useful next guides


Need help with your website or inquiry workflow? See how WinflowAI can help.